Often Wondering how to upload images using core php, here is the step by step detailed guide
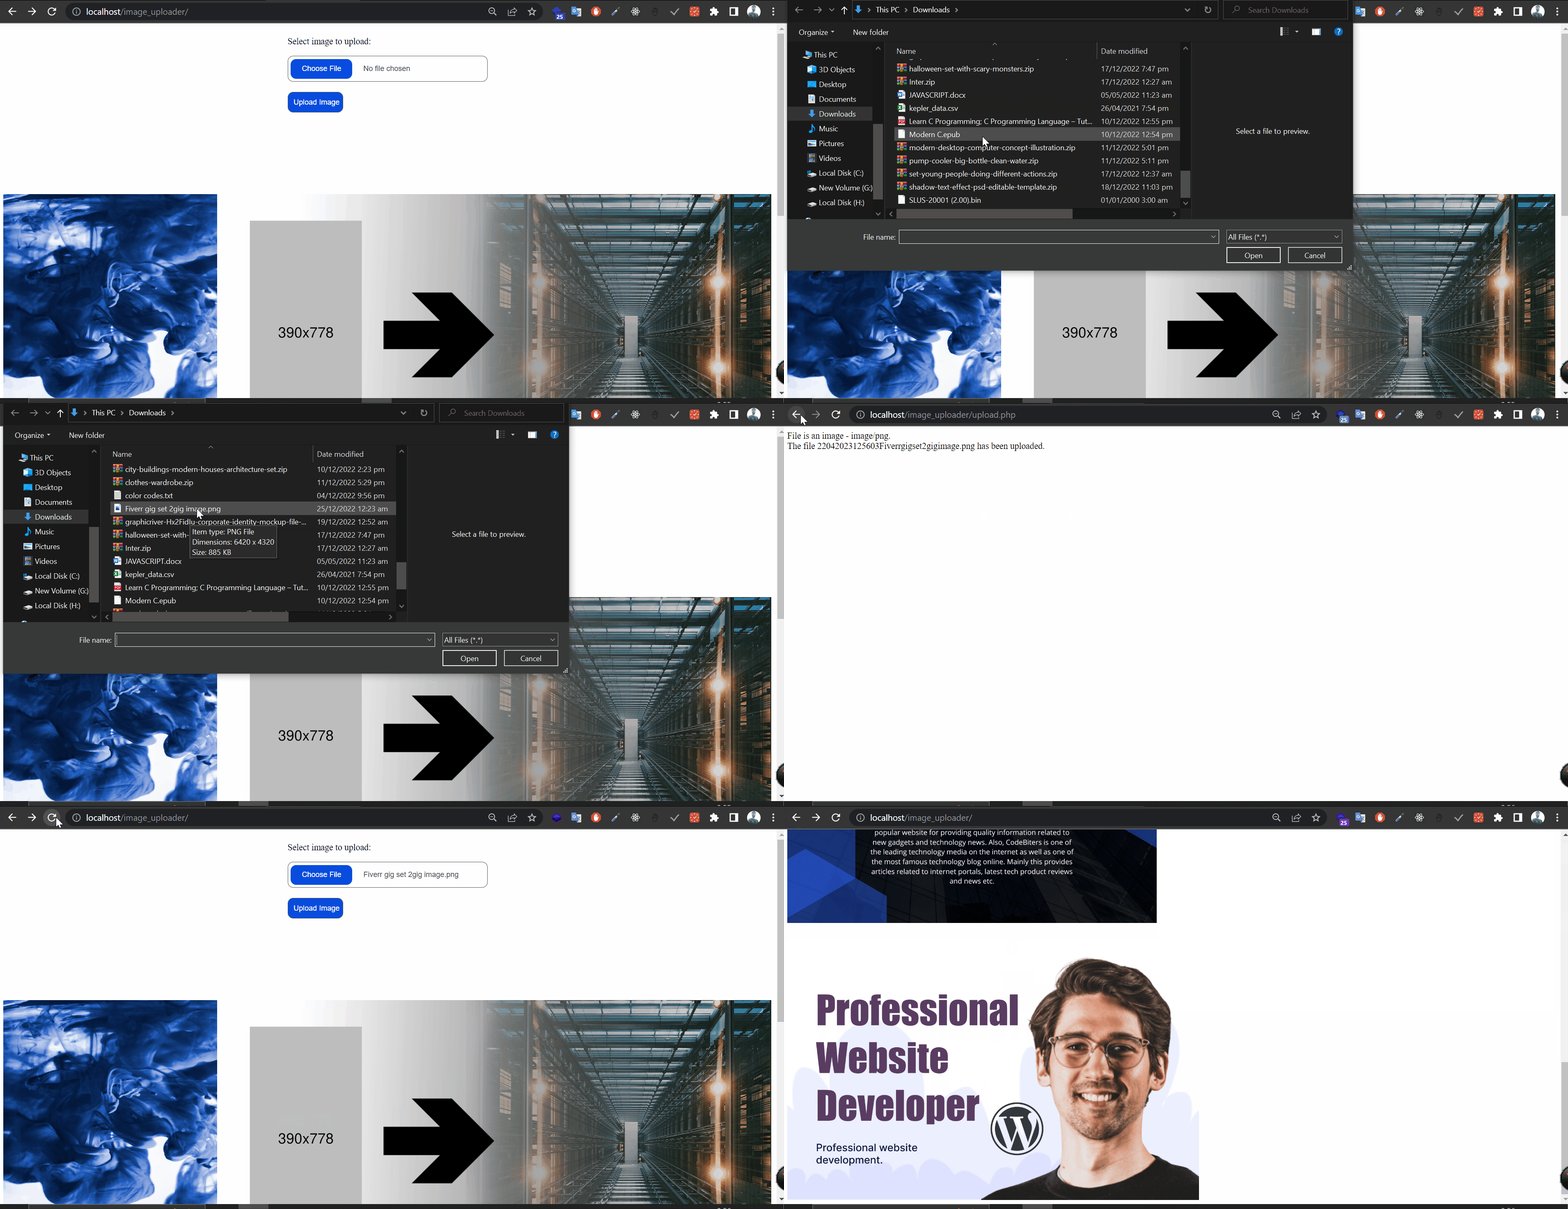 Final Result We Will Get After Going Through This Tutorial
Uploading images to the server is something that is used in almost every application and every programmer should know how this feature works and how one can implement it in an application. We will walk you step by step and explain its implementation using PHP. We won't be using any fancy user interfaces but will focus on in depth working of this feature.
STEP 01: Enabling File Uploads In Server
First of all you have to check if your server supports image uploads. Open the php.ini and search for the file_uploads flag if it is On you are good to go otherwise you have to turn it On as shown below.
Copied!file_uploads = On
Furthermore, If you don't know about php.ini file or where it is located, php.ini is a configuration file containing the settings of PHP web server. You can change these settings as per your needs. Although it is different for different operating systems but its usual locations on the most common operating systems are as follows:
WINDOWS: C:\xampp\php\php.ini
The most common way of installing PHP on windows is by installing XAMPP which also installs PHP on your system. If you install PHP by using XAMPP, its location will be totally dependent on the installation of XAMPP. If you'd installed php manually it may also be located in C:\Windows\php.ini
“On almost every OS(Operating System), you can use php --ini to know the location of active php.ini file.”
STEP 02: Make A Directory Structure
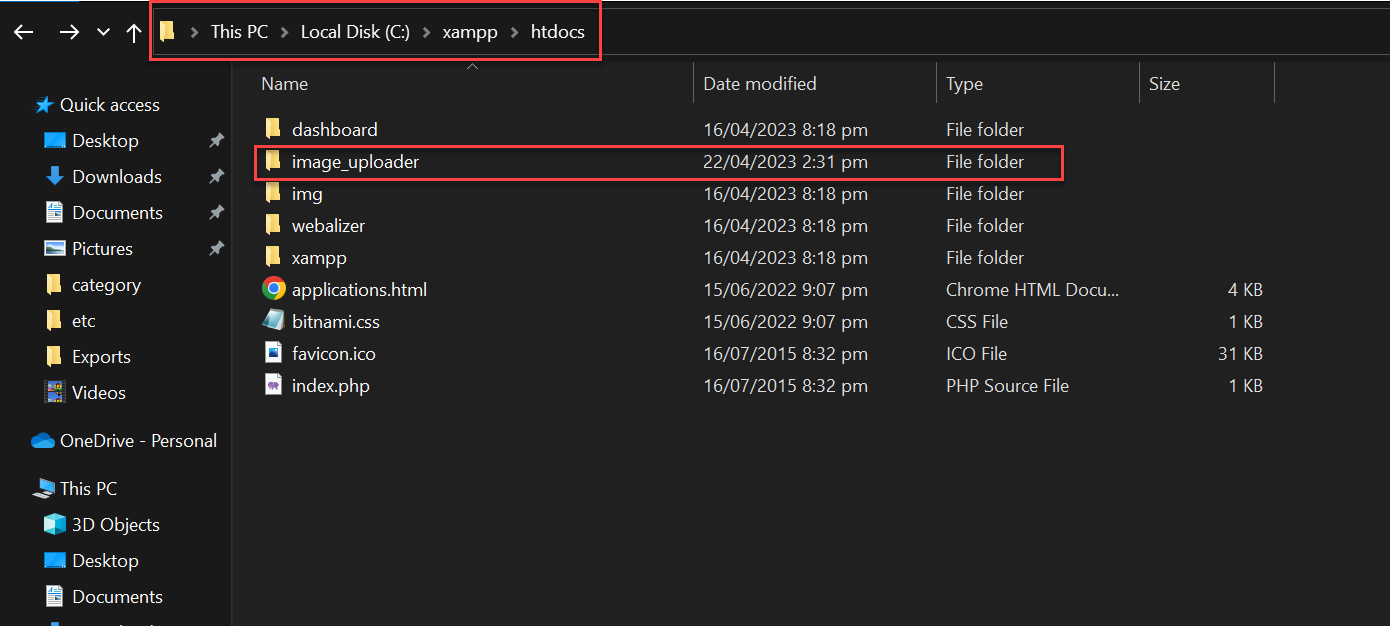
You should have an image_uploader folder inside the htdocs folder of XAMPP directory. The htdocs folder is the root directory of your web server. It is the directory that contains all the files that are accessible by the web server. If you don't have htdocs folder in your XAMPP directory then you have to create it. The directory structure should look like this.
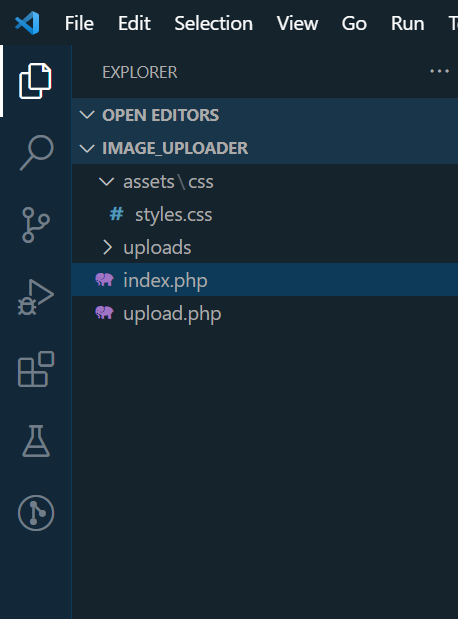
Inside the image_uploader folder you have to create two folders named assets and uploads. The assets folder will contain all the css and js files and the uploads folder will contain all the images that will be uploaded by the user. The directory structure should look like this.
STEP 03: Setting Up A Form
After checking the configuration of your server you have to create an html form. Using this HTML form user will be able to upload image
but this will not be stored on the server. We will look just into that in the next step, don't worry, but for now let's create an html form. Create a directory on on your computer by using Notepad OR any other text editor like VS Code with .php extension. Name of the file should be index.php. You can also choose file name of your choice like abc.php but there must be .php at the end which is the end of the file. So, let's create the form.
Copied!<!DOCTYPE html>
<html>
<head>
  <link rel="stylesheet" href="assets/css/styles.css">
</head>
<body>
  <div class="form_wrapper">
    <form action="upload.php" method="post" enctype="multipart/form-data">
      <p>Select image to upload:</p>
      <input type="file" name="fileToUpload" id="fileToUpload"> <br>
      <input type="submit" value="Upload Image" name="submit">
    </form>
  </div>
</body>
</html>
Copy and paste the above code into the file, save the file and open it with chrome or any other web browser. You should see the following into the browser.
The action="upload.php" tells the browser to send the form to upload.php on the same server. You have to put the url of the server if you are using some other server instead of upload.php.
The method="post" specifies that we want to send the form using post method in order to securly send the image to the server.
The enctype=multipart/form-data specifies the type of content to be sent to the server. If you are sending the image to the server it must be multipar/form-data.
The type="file" will display a choose file button to the user and when user will click that button he will be able to pick and image from his computer.
STEP 04: Create PHP Script
When a user will select the image from his computer and press upload button the file will be submitted to uploads.php on the server. If you haven't created upload.php on your computer now you have to create
Copied!<?php
$target_dir = "uploads/";
$newFileName = date('dmYHis') . str_replace(" ", "", basename($_FILES["fileToUpload"]["name"]));
$target_file = $target_dir . $newFileName;
$uploadOk = 1;
$imageFileType = strtolower(pathinfo($target_file, PATHINFO_EXTENSION));

// Check if image file is a actual image or fake image
if(isset($_POST["submit"])) {
  $check = getimagesize($_FILES["fileToUpload"]["tmp_name"]);
  if($check !== false) {
    echo "File is an image - " . $check["mime"] . ".";
    $uploadOk = 1;
  } else {
    echo "File is not an image.";
    $uploadOk = 0;
  }
}
?>
The $target_dir = "uploads/"; refers to the directory where our images will be stored.
We will rename our images by removing extra spaces and adding current date before image name, it will help us to avoid confilicts in file names. We will store the same name in database which will help us to retrieve the image afterwards. Our new name of the image will be stored in the $newFileName variable.
In $target_file, we are storing the path where our image will be stored.
In $uploadOk = 1;, here we are setting a flag that will will change later on.
In $imageFileType;, in this variable we are checking the extention of image weather it is a .png, .jpg or anything else.
Next, we are simply checking if the file is an image or not. If it is an image we will set $uploadOk = 1; otherwise we will set $uploadOk = 0; and will not upload the image to the server.
STEP 05: Add Some Validation
In order to keep your server secure and protect it from unauthorized activities we should always validate the requests coming from client side. For example, you wouldn't be allowing some random person to upload extremely large images to your server because it can took over your most important resource i.e. memory. Let's see how you can add a validation on the length of an image. Check out the code below.
Copied!// Check file size e.g. limit to 1000kb
if ($_FILES["fileToUpload"]["size"] > 1000000) {
  echo "Sorry, your file is too large.";
  $uploadOk = 0;
}
Similarly, we can also restrict user to upload only image with only a limited number of extensions. Look at the code snippet below
Copied!// Allow certain file formats
if($imageFileType != "jpg" && $imageFileType != "png" && $imageFileType != "jpeg"
&& $imageFileType != "gif" ) {
  echo "Sorry, only JPG, JPEG, PNG & GIF files are allowed.";
  $uploadOk = 0;
}
You may also want to check if the file already exists or not. For this, you can add the code below. I will not be adding this code as i will be treating all the files as unique by adding a timestamp before the file name.
Copied!// Check if file already exists
if (file_exists($target_file)) {
  echo "Sorry, file already exists.";
  $uploadOk = 0;
}
Next we will add database logic to store the image name in database. We will be using MySQL database for this tutorial but ofcourse you can use any database you want. Similarly, i will be using MySQLi extension for this tutorial and you can also use PDO extension.
Now after adding the database code the full PHP script should look like below in upload.php file:
Copied!<?php
$target_dir = "uploads/";
$newFileName = date('dmYHis') . str_replace(" ", "", basename($_FILES["fileToUpload"]["name"]));
$target_file = $target_dir . $newFileName;
$uploadOk = 1;
$imageFileType = strtolower(pathinfo($target_file, PATHINFO_EXTENSION));

// Check if image file is a actual image or fake image
if (isset($_POST["submit"])) {
  $check = getimagesize($_FILES["fileToUpload"]["tmp_name"]);
  if ($check !== false) {
    echo "File is an image - " . $check["mime"] . "." . "<br>";
    $uploadOk = 1;
  } else {
    echo "File is not an image." . "<br>";
    $uploadOk = 0;
  }
}

// Check file size e.g. limit to 1000kb
if ($_FILES["fileToUpload"]["size"] > 1000000) {
  echo "Sorry, your file is too large." . "<br>";
  $uploadOk = 0;
}

// Allow certain file formats
if (
  $imageFileType != "jpg" && $imageFileType != "png" && $imageFileType != "jpeg"
  && $imageFileType != "gif"
) {
  echo "Sorry, only JPG, JPEG, PNG & GIF files are allowed." . "<br>";
  $uploadOk = 0;
}

function insertIntoDatabase($fileName)
{
  $servername = "localhost";
  $username = "root";
  $password = "";
  $dbname = "goglar_db";

  // Create connection
  $conn = new mysqli($servername, $username, $password, $dbname);
  $stmt = $conn->prepare("INSERT INTO images (image_name) VALUES (?)");
  $stmt->bind_param("s", $imageName);
  $imageName = $fileName;
  $stmt->execute();

  $stmt->close();
  $conn->close();
}

// Check if $uploadOk is set to 0 by an error
if ($uploadOk == 0) {
  echo "Sorry, your file was not uploaded." . "<br>";
  // if everything is ok, try to upload file
} else {
  if (move_uploaded_file($_FILES["fileToUpload"]["tmp_name"], $target_file)) {
    insertIntoDatabase($newFileName);
    echo "The file " . $newFileName . " has been uploaded." . "<br>";
  } else {
    echo "Sorry, there was an error uploading your file." . "<br>";
  }
}
?>
Here we have introduces a new function insertIntoDatabase($fileName) which will be used to insert the image name in database.
After moving the image in our Uploads directory we will call the insertIntoDatabase($newFileName); function to insert the image name in database.
Now in insertIntoDatabase($fileName) function we are simply providing the credentials of our database.
Here, $servername is the name of our server, it also refers to the location of server. You can also store the URL of your server here if you are using a remote server.
$username is the username of your database.
$password is the password of your database.
$dbname is the name of your database where our image names will be stored.
Now after filling up all the information required, you have to make a conection with the server and we usually do this by using new mysqli() and passing the credentials as parameters.
;
After making a connection with the server we will prepare a query to insert the image name in database.
In prepare query we usually pass ?, where we need to pass the values.
In bind_param() function we will pass the type of data and name of the variable whose value we want to pass to the query.
The execute() function will simply execute the query and insert the record into database.
"Don't forget to close the statement and the connection after you are done with the database operations. Because if you don't close the connection and statement, it will consume your server resources and will slow down your server."
STEP 06: Create a Database
Now we will create a database and a table to store the image names. Login to phpmyadmin server and create a database named goglar_db. I am using phpmyadmin to create database, you can also use command line or any other DBMS tool to create the database.
Click on new button at top left corner to create a new database.

Enter the name of the database goglar_db and click create.
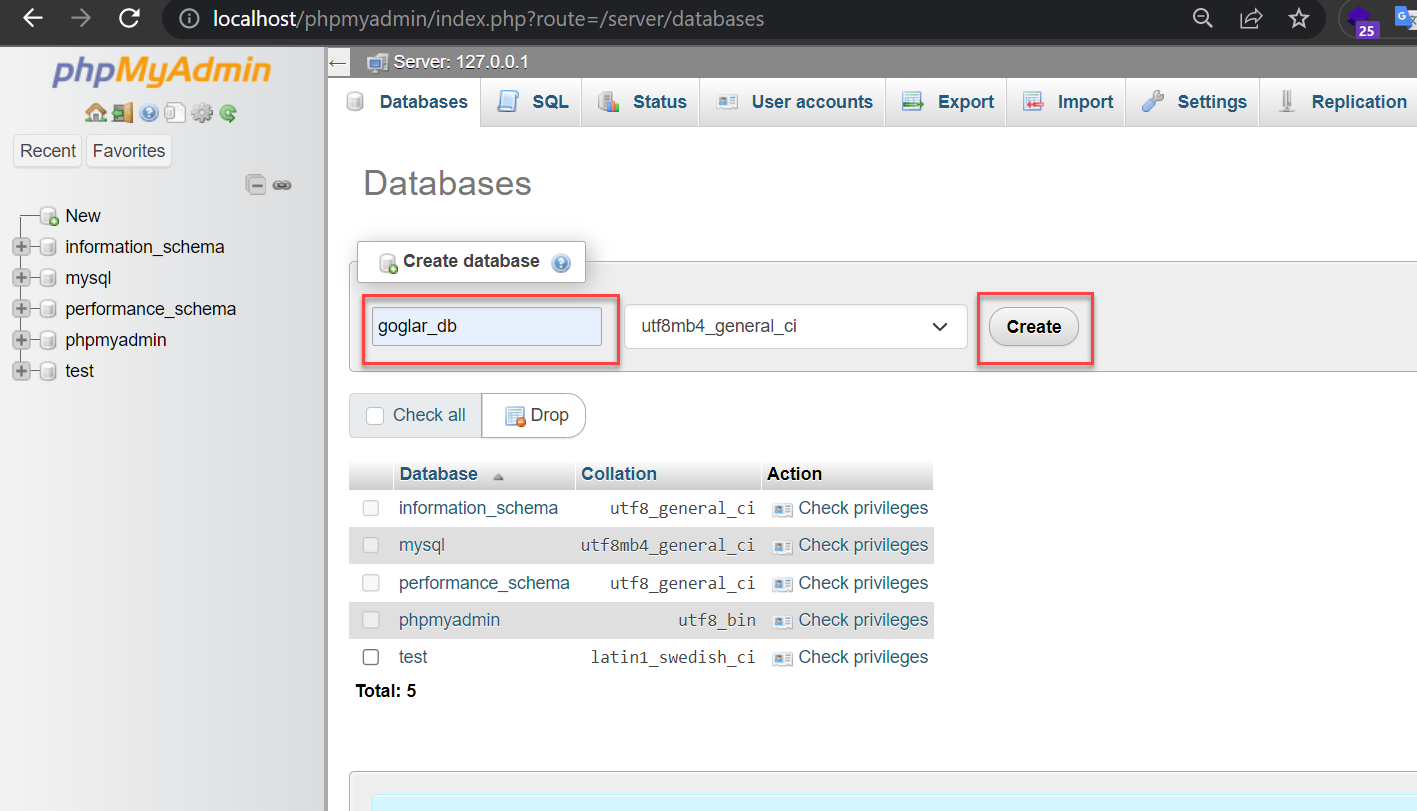
Now we will create a table named images to store the image names. Click on the database name goglar_db on top left corner.
After clicking on the database name, you should see the following.
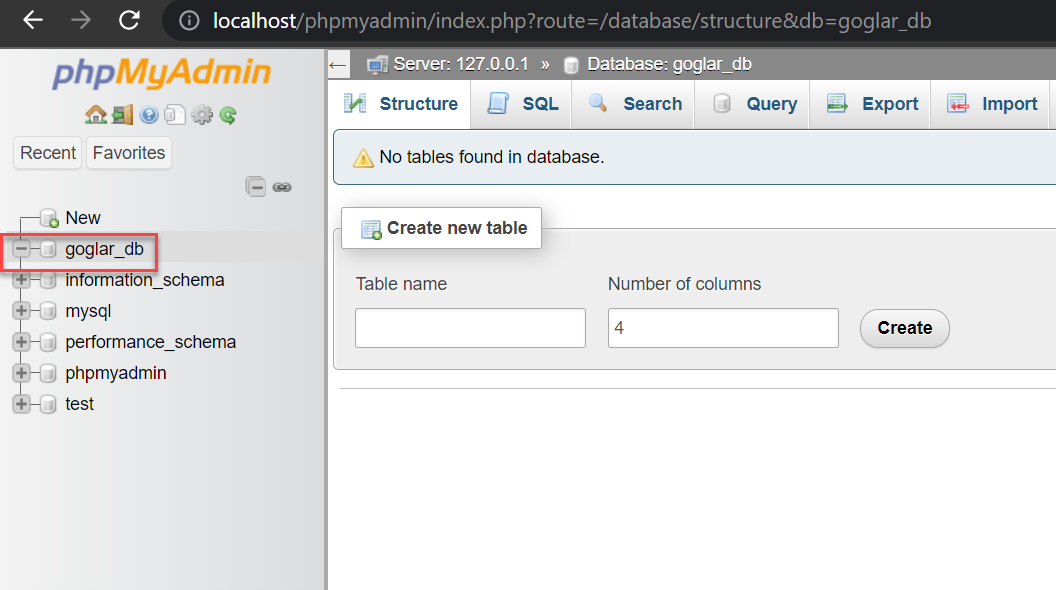
Now change the number of columns to 2, enter the name of table (images) and click on create.

Final step is to create two columns in the table. First column will be storing primary key of the table and the second column image_name will be storing the name of the image.
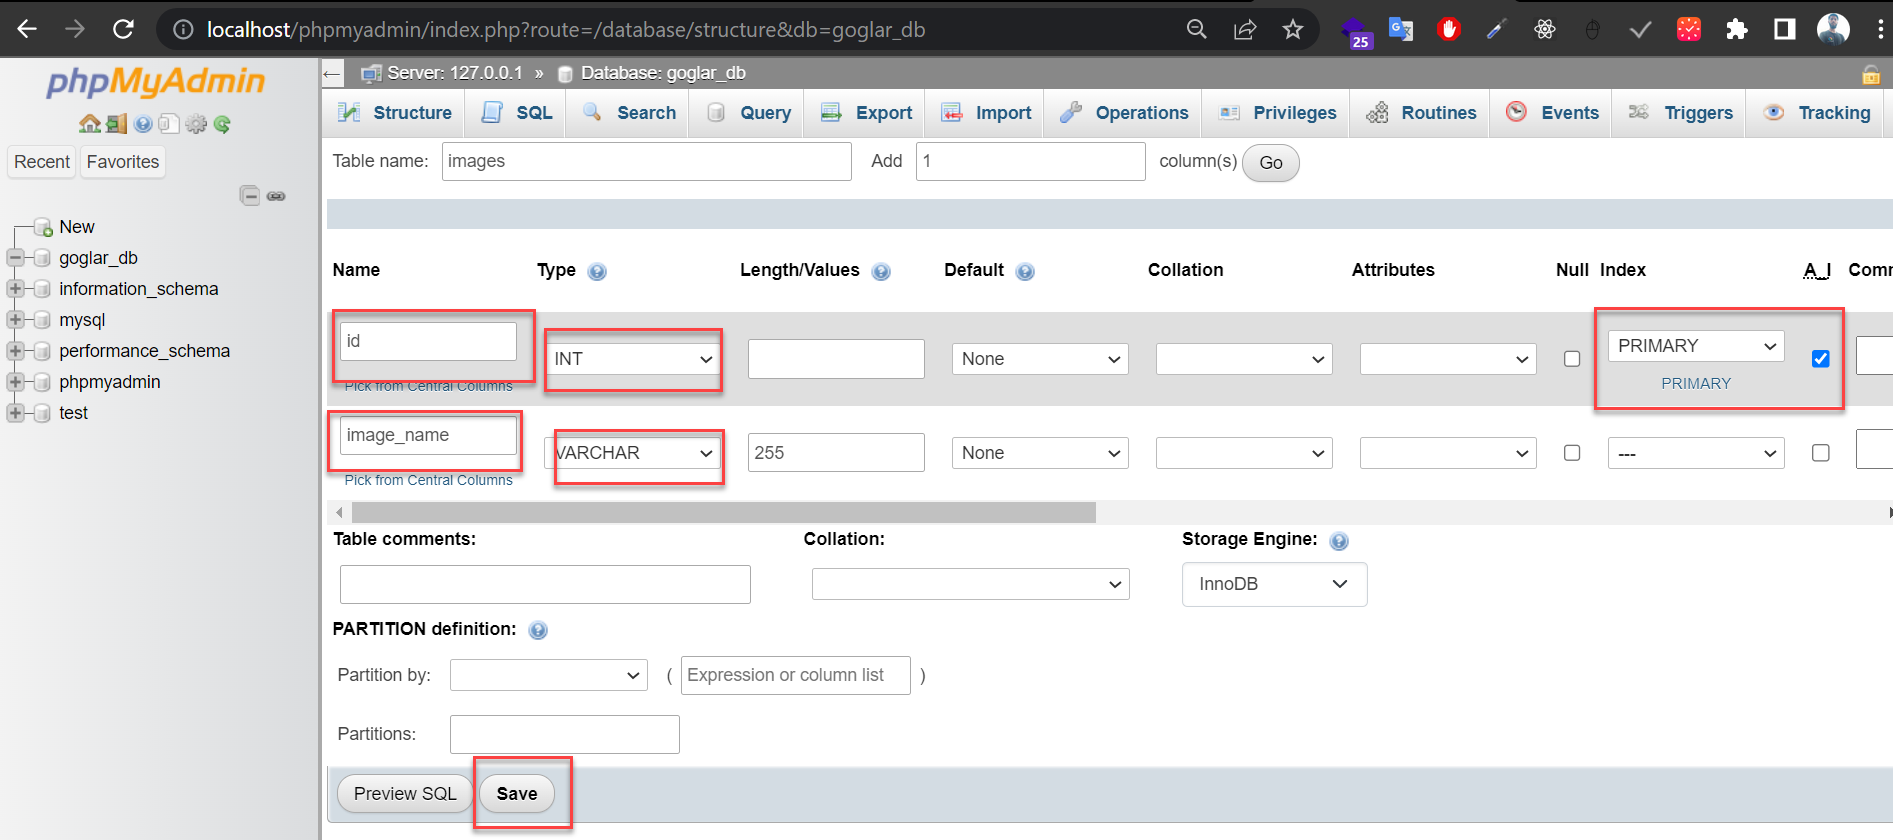
id column should be set as primary key and must be auto incremented.
image_name column should be set as varchar(255).
After entering the above information click on save button.
STEP 05: Retrieve Images from Database
Now we will implement the logic to retrieve the images from database and display them on the page.
We will simply use select query to retrieve the images from database and make a link to the uploads directory to display the images.
Your index.php script should look like below:
Copied!<!DOCTYPE html>
<html>

<head>
  <link rel="stylesheet" href="assets/css/styles.css">
</head>

<body>

  <div class="form_wrapper">
    <form action="upload.php" method="post" enctype="multipart/form-data">
      <p>Select image to upload:</p>
      <input type="file" name="fileToUpload" id="fileToUpload"> <br>
      <input type="submit" value="Upload Image" name="submit">
    </form>
  </div>

  <div class="images_wrapper">
    <?php
    $servername = "localhost";
    $username = "root";
    $password = "";
    $dbname = "goglar_db";

    $conn = new mysqli($servername, $username, $password, $dbname);

    $sql = "SELECT image_name FROM images";
    $result = $conn->query($sql);

    if ($result->num_rows > 0) {
      while ($row = $result->fetch_assoc()) {
        $file_url = 'uploads/' . $row["image_name"];
        if (file_exists($file_url)) {
          echo "<img src=" . $file_url . ">";
        }
      }
    } else {
      echo "No images found";
    }
    $conn->close();
    ?>
  </div>
</body>

</html>
STEP 05: Add Little Bit Of CSS
Now we will add some CSS to make our page look better. Create a new file named styles.css in assets/css directory and add the following code.
Copied!.form_wrapper {
  display: flex;
  flex-direction: column;
  justify-items: left;
  align-items: center;
  height: 200px;
}

form {
  display: flex;
  flex-direction: column;
}

input[type="submit"] {
  width: 100px;
  max-width: 100%;
  color: #fff;
  cursor: pointer;
  padding: 10px;
  background: #084cdf;
  border-radius: 10px;
  border: 1px solid #555;
}

input[type="file"] {
  width: 350px;
  max-width: 100%;
  color: #444;
  padding: 5px;
  background: #fff;
  border-radius: 10px;
  border: 1px solid #555;
}

input[type="file"]::file-selector-button {
  margin-right: 20px;
  border: none;
  background: #084cdf;
  padding: 10px 20px;
  border-radius: 10px;
  color: #fff;
  cursor: pointer;
  transition: background 0.2s ease-in-out;
}

input[type="file"]::file-selector-button:hover {
  background: #0d45a5;
}

.images_wrapper {
  margin-top: 100px;
  display: flex;
  flex-wrap: wrap;
}

.images_wrapper img {
  width: auto;
  height: 500px;
}
That's it, we have successfully created a simple image upload and display application using PHP and MySQL.